# 前言
本教程是基于 “apifm-wxapi” 模块,教你快速实现小程序开发,所以你可能需要先了解以下知识点:
[《创建 HelloWorld 项目》](https://www.yuque.com/apifm/doc/hezlrm)
[《使用 “apifm-wxapi” 快速开发小程序》](https://www.yuque.com/apifm/doc/mdldsd)
[《免费注册开通后台,获得专属域名》](https://www.yuque.com/apifm/doc/qr6l4m)
# 功能说明
后台发布优惠券信息,可设置固定金额、金额范围(随机金额)、领取口令;
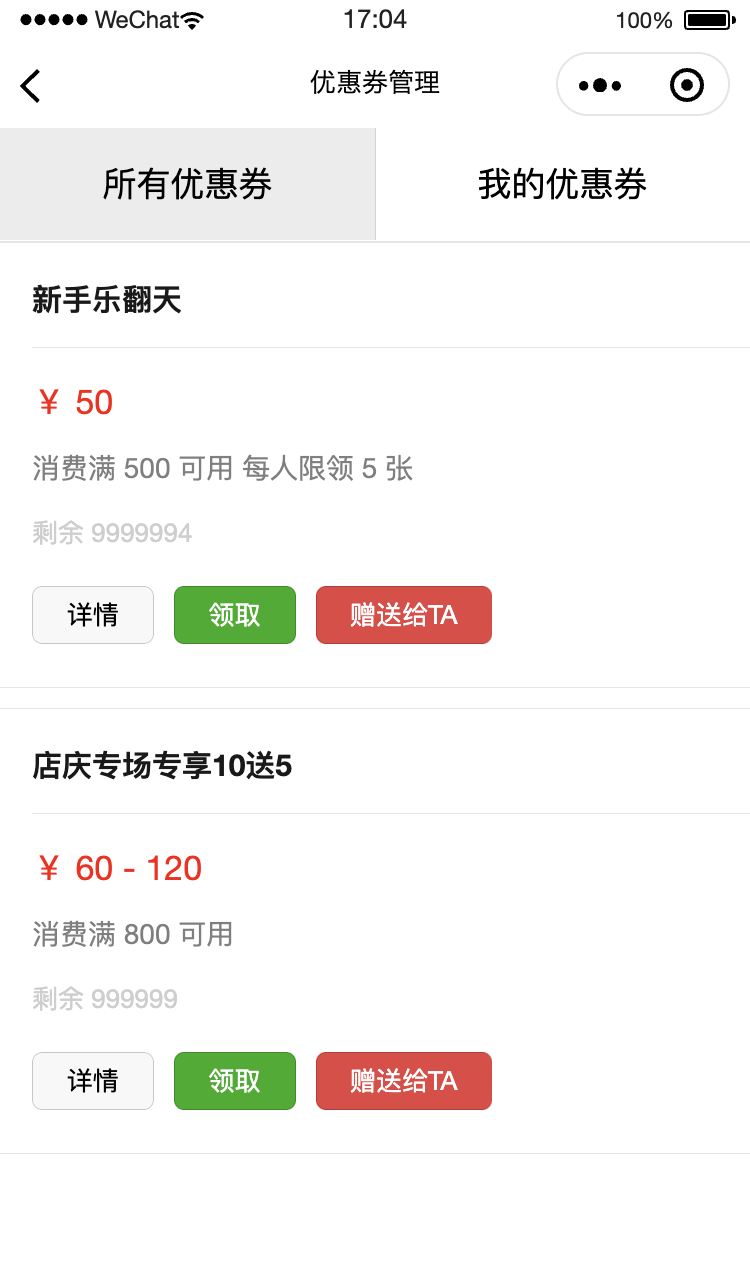
小程序展示所有可领取的优惠券信息;
用户登录后可领取优惠券,领取后在后续的订单模块中下单时候使用;
需要可以管理我的优惠券(可将自己的优惠券赠送给别人);
# 启用 “优惠券” 模块
登录 “第一步” 注册的后台,左侧菜单 --> 工厂设置 --> 模块管理
找到 “优惠券” 模块,点击 “启用模块” ,然后 F5 刷新一下后台界面,你将可以看到新的菜单:
“财务管理” --> “优惠券规则” + “优惠券管理” 2 个菜单 ;
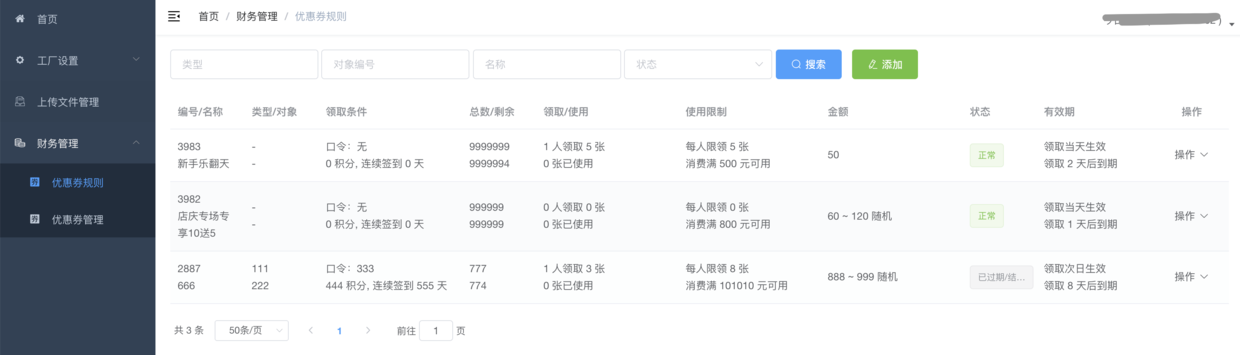
# 后台管理
## 添加优惠券规则
添加优惠券规则,根据你自己的实际情况创建优惠券的规则,用户领取后,将按照设定的规则给用户发放优惠券;
## 优惠券管理
用户领取优惠券后,将在这个菜单进行管理,管理员可以手动作废用户的优惠券;
# 小程序实现
## 效果演示
## wxml代码
```plain
{{item}}
{{ item.name }}
¥ {{ item.moneyMin }}
¥ {{ item.moneyMin }} - {{ item.moneyMax }}
消费满 {{ item.moneyHreshold }} 可用
每人限领 {{ item.numberPersonMax }} 张
需要口令
需要{{ item.needScore }}积分
连续签到{{ item.needSignedContinuous }}天
剩余 {{ item.numberLeft }}
读取数据请查看控制台,页面渲染可以自己动手,参考 TAB1
```
## js代码
```plain
const WXAPI = require('apifm-wxapi')
const sliderWidth = 96; // 需要设置slider的宽度,用于计算中间位置
Page({
/**
* 页面的初始数据
*/
data: {
tabs: ["所有优惠券", "我的优惠券"],
activeIndex: 0,
sliderOffset: 0,
sliderLeft: 0,
couponList: undefined
},
onLoad: function (options) {
const _this = this;
wx.getSystemInfo({
success: function (res) {
_this.setData({
sliderLeft: (res.windowWidth / _this.data.tabs.length - sliderWidth) / 2,
sliderOffset: res.windowWidth / _this.data.tabs.length * _this.data.activeIndex
});
}
});
this.coupons()
},
onShow: function () {
},
goRegist() {
wx.navigateTo({
url: '/pages/auth/index'
})
},
tabClick: function (e) {
this.setData({
sliderOffset: e.currentTarget.offsetLeft,
activeIndex: e.currentTarget.id
});
if (e.currentTarget.id == 0) {
this.coupons()
} else {
this.myCoupons()
}
},
coupons(){
WXAPI.coupons().then(res => {
console.log(res)
if (res.code == 0) {
this.setData({
couponList: res.data
})
} else {
wx.showToast({
title: res.msg,
icon: 'none'
})
this.setData({
couponList: null
})
}
})
},
myCoupons(){
const loginToken = wx.getStorageSync('loginToken')
if (!loginToken) {
wx.showToast({
title: '请先登录',
icon: 'none'
})
this.goRegist()
return
}
WXAPI.myCoupons({
token: loginToken.token
}).then(res => {
console.log(res)
if (res.code == 0) {
this.setData({
couponList: res.data
})
} else {
wx.showToast({
title: res.msg,
icon: 'none'
})
this.setData({
couponList: null
})
}
})
},
couponDetail(e){
const id = e.currentTarget.dataset.id
WXAPI.couponDetail(id).then(res => {
console.log('优惠券详情数据:', res)
wx.showModal({
title: '提示',
content: '读取成功,查看控制台',
showCancel: false
})
})
},
fetchCoupons(e){
const loginToken = wx.getStorageSync('loginToken')
if (!loginToken) {
wx.showToast({
title: '请先登录',
icon: 'none'
})
this.goRegist()
return
}
const id = e.currentTarget.dataset.id
WXAPI.fetchCoupons({
id: id,
token: loginToken.token
}).then(res => {
console.log(res)
if (res.code == 0) {
wx.showToast({
title: '领取成功',
icon: 'success'
})
} else {
wx.showToast({
title: res.msg,
icon: 'none'
})
}
})
},
sendCoupons(e){
console.log('该方法作为作业留给你来实现')
// WXAPI.sendCoupons({ })
}
})
```
> WXAPI.init('gooking') 这句代码是将你的小程序链接到你的后台,其中 gooking 这个是你的专属域名(请查看前言中关于专属域名的章节说明);
>
# 总结
本案例主要使用了 apifm-wxapi 的以下3个方法:
```plain
WXAPI.coupons(Object object)
WXAPI.couponDetail(id)
WXAPI.fetchCoupons(Object object)
WXAPI.myCoupons(Object object)
WXAPI.sendCoupons(Object object)
```
**关于更加详细的参数使用,以及更加高级的进阶使用方法,可以参考api接口文档说明:**
[《api接口文档》](https://api.it120.cc/doc.html)
_关于 apifm-wxapi 更多的使用方法:_
[《apifm-wxapi使用说明》](https://github.com/gooking/apifm-wxapi/blob/master/instructions.md)
_本案例Demo代码下载:_
[《apifm-wxapi使用Demo程序》](https://github.com/gooking/apifm-wxapi-demo)
期待你的进步!
感谢!